Apple a day dress

Marina in apple dress

Yet ANOTHER woollen moth casualty – this time they munched multiple holes a much-loved green woollen wraparound skirt. Greedy. Bastards.

Apple dress cut out

So, I size it up for a toddler’s tunic dress, just cutting approximately around another jumper dress and keeping the existing hem and side seam. As I’m cutting, I notice one of the offcuts looks like a leaf (see? between the armholes of the front and back?), and the apple motif follows quite naturally.

And then I’m off down memory lane… I had a dress with an apple on it as a child. Here is the original apple dress.

So I cover the mothholes with an applique apple. As it’s a fuzzy woollen, I’m guessing it won’t fray, so don’t finish any cut edges, or use interfacing to stabilise the apple. (Two machine washes later & I’m proved right – all stable AND unfrayed). The rest is dead easy: machine stitch the apple into place, followed by the side & shoulder seams, then fold the seam allowance once on the neck & armholes and stitch. It’s a bit wonky – my cutting, I’m afraid, but I figure it’ll wear ok.

Apple dress finished

The neckline looks pretty small all of a sudden, so I make two self-

Apple dress loopsApple dress button

covered buttons and loops for a shoulder fastening, and a small facing for each edge. This takes ages but I like the finished look.

However, in the cold light of day, it turns out the neckline is too BIG, so I run a little elastic thread through it with a darning needle – this works perfectly and Marina seems to like it!

Marina in apple dress laughing

NB After about 85 blurred photos she suddenly climbs on the sofa and strikes a slightly eerie doll pose. For a second. Then runs off and jumps around a bit more. Photographing a toddler to show off a garment is REALLY hard work. How do you do it?

Marina in apple dress doll pose

————*-*————

Oh and I also made this hat from the offcuts. It’s simply a rectangle, sewn up the short side, hemmed at the bottom and tied around with a strip.

Apple hat

She wouldn’t keep it on for more than a second, threw it off and now we cannot find it ANYWHERE. Prolly been munched to dust, by a bunch of delighted moths.

M is for… marimekko

marina in marimekkoSnaffled a lovely child’s Marimekko t-shirt at the Chiswick Boot Sale last weekend, only to find small hole in the front. So rustle up plan to hide it in a reverse applique ‘M’. I get busy while the little one slumbers and take

  • one vintage pillow-case, from a Secret Thrift Shop up north
  • one reverse applique tutorial – gazillions out there!
  • fusible interfacing from stash
  • embroidery thread from Brick Lane
and …
  • choose a design – I use a capital ‘M’ from the Eames stencil font. I measure out 10cm on a piece of paper, pull the ‘M’ up on screen and enlarge it until it is about 10cm wide, then trace directly from the screen.
  • draw ‘M’ onto the WRONG side of interfacing. Note: I get this wrong so my final ‘M’ is actually the wrong way round. I realise this WELL past the point of no return – but am saved by M’s symmetry – phew!
  • fuse the interfacing to the WRONG side of the applique fabric
  • cut out ‘M’ +3-4mm
  • pin to the WRONG side of the tshirt. Make sure I cover the hole!
  • sew with a straight stitch around the ‘M’
inside the reverse applique
  • on the RIGHT side, handstitch a running stitch in embroidery floss along the machine stitch line
cutting out the m reverse applique
  • snip out the tshirt fabric 3mm inside the embroidery line
Next time I do it I will
– make sure my letter/pattern is the right way round – FIRST time
– attach interfacing more carefully – it took me three goes because I ironed too vigorously and smooshed up the interfacing
– make sure my design actually COVERS the hole – I cut one ‘M’ way too small
– consider purchasing an embroidery hoop – it would make the handstitching easier.
Once done, grapple with the thorny challenge of a small, determined model, who is capable of wriggling, running and roaring independent movement.
Thanks Daddy for taking over on the camera!

action shot of marina

Short trews

marina in short trousers

From a pair of unflattering shorts comes a pair of short trews for our little miss. The shorts are low rise, pegged and cut my thighs off at their widest – so rarely get worn, funnily enough. But a nice fabric and decently made, so I hang on to them for years longer than I oughta.

It’s the low-rise that does it – a few sunny weeks back I find myself thinking they are so ridiculously low, they’ll probably fit Marina in a matter of months… so I measure them against a pair of her trousers and the infinitesimal difference inspires me to make sure SOMEONE wears them before summer disappears.

A few refashioning hours later they are transformed, after I

  • remove 20cm from the overall waistband and leg width
  • fake a ruffled hip pocket from the spare fabric trimmed off
  • insert elastic into the waistband
  • insert new but thrifted button on waistband
  • remove 5cm from the legs at the back yoke seam (this brings the back waistband down so the difference between it and the front is only about 3cm)
  • reposition the back pockets, having sewn in small pleats at the top to reduce width
  • gather the leg hems into an elastic
marina stands in short trews
The shape is by eye and I make it up as I go along. The 14-month old figure is pretty straight up and down, so the side seams are at a right angle to the bottom hem. Levelling out the waistband – again by eye, but also using another pair of shorts for reference. Back pockets are pleated so they fit onto the back leg, but keep the lovely curve and point of the original design.
short trews pocket and yoke
With hindsight, it is a pretty easy project. But I am mightily pleased to have finished these, as I’d forgotten how faffy refashioning can be – realising you could have done something better, dithering over whether to unpick and redo, not measuring my daughter so not knowing how tight to make the waistband and regretting sewing while she’s asleep but knowing it’s not possible when she’s up and about. Beginner’s mistakes after decades of sewing, but they come back time and time again.
short trews fake frill pocket
But do you know what was the biggest surprise? I thought, I even wrote (see two paras above), that I dreamed this design up – the feminine frills at the pocket, the gathered rear pockets, and elasticated leg cuffs.
side by side short trews
But NO. I only realised it when I pulled these H&M jeans from the washing machine… what a rip-off!
Oops! Don’t tell anyone, will you?

Genuine whip-up – from roll neck to baby hat

baby hat from roll neck

I often read blog posts where something that is super-complex, beautifully finished AND winningly photographed is described as having been ‘whipped up’. I yearn for the day when a few hours at the kitchen table / sewing machine results in a well-fitting, photogenic, suitable and stylish garment.

Don’t get me wrong folks, I don’t not believe you.  It’s just that ‘whipping up’, with its implications of speed, deftness and lack of mind-boggling so infrequently describes my making process.

Maybe I need to cut back on the staring into space and taking on hyper-complicated concepts (like projects without sewing patterns AND future-proofed for body shape changes AND complex fabric patterns that require pattern-matching so they don’t look daft – all in one garment).

However, last night’s baby hat creation really was a genuine whip up. I didn’t time it, but I think we’re talking about 10 minutes. And I’m quite pleased with it – although frustrated that I’ll have to wait at least 2 ½ months to see if I got the fit right.

whip up baby hat on me

Take

  1. one jersey roll neck. Mine is from the irresistably cheap but questionable Primark. The rollneck itself is double thickness with a central seam at the back.
  2. cut off roll neck and turn leftover tshirt into v-neck (much more flattering to my maternal bosom shape)
  3. cut off resulting ‘V’ and cut into 7-10mm wide strips
  4. fold strips in half, then tuck into top of cut edge of roll neck, at corners
  5. overlock /zigzag the cut edge of roll neck, making sure to catch strips in stitching
  6. trim loose threads.

Erm, that’s it. I didn’t take pics as I went along, but the drawings should give you the idea…

instructions for baby hat from primark jersey roll neck

An advent owlendar

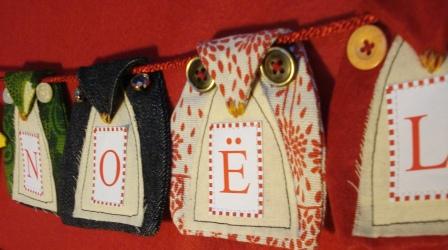
Noel owls

It’s beginning too-whoo feel a lot like Christmas…

Radio4 wheezes into life just after six this morning and as usual, I lie there and let the programme wash over me without fully listening or actually getting up. When ‘On Your Farm’ starts, half an hour later, with the opening line ‘“Wols” is an old english word for rolling hills, and it’s to Yorkshire’s Wols that we’re going to today to visit a 600-acre arable farm with 2,000 hens producing blah blah blah blah’, I spring into life. Wols! As well as being an old english word for ‘rolling hills’, it’s also an anagram of ‘owls’ and that’s what I’m crafting today! When the presenter continues, explaining he is setting off from his home in the Cotswols to visit this poultry farm, I realise my mistake. Cotswolds. WOLDS not wols. Clothears, as my mother used to say…
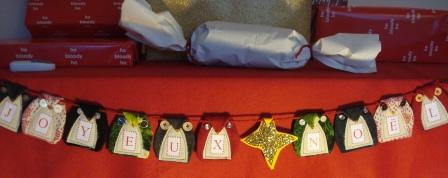
Anywhoo. It gets me up to finish project (from the pattern by the very talented moonstitches) that makes

  1. a colourful and pretty festive banner
  2. lovely ‘put it together yourself’ present kit wot can teach a bit of french too and
  3. a making good on a promise to make things for other people
  4. an owlendar of projects past and future

First three features were deliberate, the fourth comes to me as kitchen table turns into production line of owl bodies, breasts, beaks and somewhat tedious 20 owly button eyes.

Joyeux noel owl banner

This strigine [Stri”gine\, a. (Zo[“o]l.) Of or pertaining to owls; owl-like] string of scraps references crafting and thrifting projects of the last couple of years, including a fantastically random find by my husband. He was working in a studio where Sony was filming an advert for some new product or other, and the bin was overflowing with offcuts of this gold glitter fabric so he helped ‘take the rubbish out’. Hehe. Thanks. That’ll do for the star!

The black wool scraps come from a belted jacket (Vogue 8436) with HUGE puff sleeves – a shoplifter’s delight ←JOKE –DSC07363 ds which is a piece of duff to construct and always gets comments when worn. From 2008.
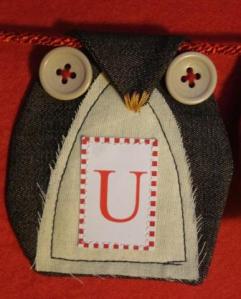
The yellow canvas scraps are from the 2009 tulip skirt and another moonstitches pattern, the owl pincushion.

Green flowers – a boot fair find from August 2009, which I’m still puzzling over, as it’s heavy curtain fabric but quite summery in its exuberance, I think.

Red and white trees – a Brussels flea market find from September 2009. And finally, some scraps leftover from the recent culottes of brown lightweight denim.

The heavyweight denim scraps come from the sunray skirt – from pre-blogging sewing in 2008 – that I’ll be repeating this year. Actually an A-line skirt in disguise – therefore easy to construct – and another commenter. DSC07357 crop

It was a lovely trip down Memory Lane and good to get to grips with some long term stash residents that I can’t work out what to do with. Why not make some owls yourself?

brown owl

MHS – this one’s for u-whoo.

About me


I started this blog to help me Get Things Done: sewing and knitting mostly.
But now I have a daughter! So I continue to daydream in enormous detail about what I'd like to make, but squeeze the 'doing' into precious naptimes and evenings.

Can I keep it up? Time will tell!

Want to follow my blog and get notifications of new posts by email?

Join 55 other subscribers

Older posts