Apple a day dress

Marina in apple dress

Yet ANOTHER woollen moth casualty – this time they munched multiple holes a much-loved green woollen wraparound skirt. Greedy. Bastards.

Apple dress cut out

So, I size it up for a toddler’s tunic dress, just cutting approximately around another jumper dress and keeping the existing hem and side seam. As I’m cutting, I notice one of the offcuts looks like a leaf (see? between the armholes of the front and back?), and the apple motif follows quite naturally.

And then I’m off down memory lane… I had a dress with an apple on it as a child. Here is the original apple dress.

So I cover the mothholes with an applique apple. As it’s a fuzzy woollen, I’m guessing it won’t fray, so don’t finish any cut edges, or use interfacing to stabilise the apple. (Two machine washes later & I’m proved right – all stable AND unfrayed). The rest is dead easy: machine stitch the apple into place, followed by the side & shoulder seams, then fold the seam allowance once on the neck & armholes and stitch. It’s a bit wonky – my cutting, I’m afraid, but I figure it’ll wear ok.

Apple dress finished

The neckline looks pretty small all of a sudden, so I make two self-

Apple dress loopsApple dress button

covered buttons and loops for a shoulder fastening, and a small facing for each edge. This takes ages but I like the finished look.

However, in the cold light of day, it turns out the neckline is too BIG, so I run a little elastic thread through it with a darning needle – this works perfectly and Marina seems to like it!

Marina in apple dress laughing

NB After about 85 blurred photos she suddenly climbs on the sofa and strikes a slightly eerie doll pose. For a second. Then runs off and jumps around a bit more. Photographing a toddler to show off a garment is REALLY hard work. How do you do it?

Marina in apple dress doll pose

————*-*————

Oh and I also made this hat from the offcuts. It’s simply a rectangle, sewn up the short side, hemmed at the bottom and tied around with a strip.

Apple hat

She wouldn’t keep it on for more than a second, threw it off and now we cannot find it ANYWHERE. Prolly been munched to dust, by a bunch of delighted moths.

Mmmm, smells…um…ok I guess

softened fabric laundry

Staged and utterly impractical laundry photo: it is 2° centigrade today. This laundry won’t dry out on the line until March

Fabric softener made from leftover hair conditioner is, according to my recent experiment,

  • easy to make
  • very quick
  • not expensive (that is, if you ignore how expensive the conditioner was in the first place)
  • satisfying in an at-least-that-waste-of-money-isn’t-gathering-dust-in-the-bathroom kind of way

but to be totally honest, the laundry doesn’t smell as amazing as the original Aveda conditioner did on my hair. Maybe I over-diluted it. And if I’m really picky, can’t say the fabric feels any softer! Have I just stumbled on a huge marketing conspiracy – fabric softener is pointless?

Not disappointed, but tiny bit underwhelmed.

An advent owlendar

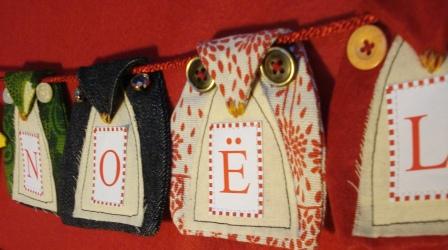
Noel owls

It’s beginning too-whoo feel a lot like Christmas…

Radio4 wheezes into life just after six this morning and as usual, I lie there and let the programme wash over me without fully listening or actually getting up. When ‘On Your Farm’ starts, half an hour later, with the opening line ‘“Wols” is an old english word for rolling hills, and it’s to Yorkshire’s Wols that we’re going to today to visit a 600-acre arable farm with 2,000 hens producing blah blah blah blah’, I spring into life. Wols! As well as being an old english word for ‘rolling hills’, it’s also an anagram of ‘owls’ and that’s what I’m crafting today! When the presenter continues, explaining he is setting off from his home in the Cotswols to visit this poultry farm, I realise my mistake. Cotswolds. WOLDS not wols. Clothears, as my mother used to say…
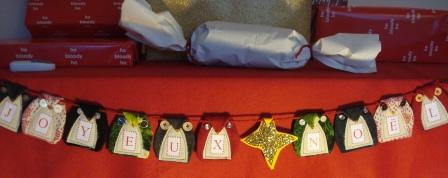
Anywhoo. It gets me up to finish project (from the pattern by the very talented moonstitches) that makes

  1. a colourful and pretty festive banner
  2. lovely ‘put it together yourself’ present kit wot can teach a bit of french too and
  3. a making good on a promise to make things for other people
  4. an owlendar of projects past and future

First three features were deliberate, the fourth comes to me as kitchen table turns into production line of owl bodies, breasts, beaks and somewhat tedious 20 owly button eyes.

Joyeux noel owl banner

This strigine [Stri”gine\, a. (Zo[“o]l.) Of or pertaining to owls; owl-like] string of scraps references crafting and thrifting projects of the last couple of years, including a fantastically random find by my husband. He was working in a studio where Sony was filming an advert for some new product or other, and the bin was overflowing with offcuts of this gold glitter fabric so he helped ‘take the rubbish out’. Hehe. Thanks. That’ll do for the star!

The black wool scraps come from a belted jacket (Vogue 8436) with HUGE puff sleeves – a shoplifter’s delight ←JOKE –DSC07363 ds which is a piece of duff to construct and always gets comments when worn. From 2008.
The yellow canvas scraps are from the 2009 tulip skirt and another moonstitches pattern, the owl pincushion.

Green flowers – a boot fair find from August 2009, which I’m still puzzling over, as it’s heavy curtain fabric but quite summery in its exuberance, I think.

Red and white trees – a Brussels flea market find from September 2009. And finally, some scraps leftover from the recent culottes of brown lightweight denim.

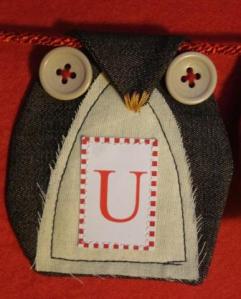
The heavyweight denim scraps come from the sunray skirt – from pre-blogging sewing in 2008 – that I’ll be repeating this year. Actually an A-line skirt in disguise – therefore easy to construct – and another commenter. DSC07357 crop

It was a lovely trip down Memory Lane and good to get to grips with some long term stash residents that I can’t work out what to do with. Why not make some owls yourself?

brown owl

MHS – this one’s for u-whoo.

Apple green weskit – from scratch

Finally finished – a wee green weskit started some time last winter or maybe earlier this year? I can’t remember.

Halfway through, I notice the sides are both longer AND shorter than the back, and stop. An October trip to Scotland – complete with ‘need to amuse oneself ‘ component – presents itself, so I unravel the offending sides and bung the the whole lot in my suitcase.

The label on this Cygnet SERIOUSLY Chunky 100% Acrylic is not untrue: it is SERIOUSLY chunky. Knit up on size 0 (8mm) wooden needles, the two – now equally sized – fronts take me a short Friday afternoon to reknit.  The remaining neck band knits up in a Saturday afternoon, and the rest is wrestled together with a HUGE darning needle on Sunday morning. 

Apple green weskit Oct 09

I’m not really accustomed to such thick wool – my thumb muscles ache and my shoulders groan. Add the combination of acrylic and wooden needles is set-your-teeth-on-edge squeaky, and the whole knit experience goes very well with feeling a bit crabby – it doesn’t alleviate the mood, just allows you to live it out and explore it in depth.

Rowan's Saffron pattern

The pattern is a slightly lengthened version of ‘Saffron‘ from Rowan’s 2007 newshapes – I just added approx 8 more rows to the body before embarking on all the armhole/neck decreasing. Overall it’s an easy pattern to follow, and knits up gratifyingly superfast. Plus you get the chance to try out with different types of making up techniques:

  • sewing two different knit styles when joining garter neckband to stocking stitch body
  • mattress stitching the side seams together
  • grafting the shoulders together – both stocking stitch

  • graft the two collars together…

I make up as I went along try a kitchener graft from memory at the top of the collar. It ain’t perfect, but by this stage ‘ain’t perfect’ is quite sufficient, thanks.

If I did it all again, I’d

  • not pose while actually EATING an apple. It make you pull funny faces
  • make the back and fronts in one piece to get rid of the hefty chunk created by side seams
  • use metal needles not wooden
  • do the kitchener graft right this time. Knit, purl,  purl, knit.

After shirt – refashion

After shirt pose

This newly-refashioned shirt was gifted from a wardrobe clear out and I pounced on it immediately: I liked the combination of colours and the frilly detail. But the minute I try it on, I can tell it is a ‘before’ – it is just too large for me. Plus, it’s shapeless, long, a little too fussy and unflattering to me in a big chest-y, no waist-y kind of way. And more depressingly, the colours look tired and dull.

But I’m determined to overlook these immediate issues and turn it into the After shirt – there’s a nice shirt in there somewhere waiting to be released. So I…

  • take in the side seams just under the arm
  • bias-bind the armholes
  • create cap sleeves from the cuffs
  • whip up a tie belt from the sleeves
  • and then finally, shorten the hemline and curve it at the hip.

After shirt cutting plan 210509

The fabric – I think it’s a polycotton, but there’s no labels at all – is a little cheap. It probably won’t age too well – it’s bobbled a bit already – so I really took my time to sewing neatly to try not to let the execution of the idea give the game away.

Lots of food for thought: next time I create a shaped hemline, I’ll make a facing  – that will make it sit flatter. No belt loops: make ’em too thin and they stick out and look cheap. And the application of the bias binding needs lots more thinking through: it works but shouldn’t show all the way round. All that from one shirt!

Repeated on Wardrobe Refashion.

About me


I started this blog to help me Get Things Done: sewing and knitting mostly.
But now I have a daughter! So I continue to daydream in enormous detail about what I'd like to make, but squeeze the 'doing' into precious naptimes and evenings.

Can I keep it up? Time will tell!

Want to follow my blog and get notifications of new posts by email?

Join 55 other subscribers

Older posts