*So* not on my to-do list…

This *so* was not on my list of things to do this morning.

20120809-103823.jpg

But while my tea is brewing, I have a thought, and that thought quickly multiplies. What if, I copy some of the techniques on my frilly-sleeved La Redoute black tshirt, and apply them to the Hello Kitty tshirt that’s been in the mend/alter/bring back to life pile for the last couple of years? Hello Kitty jumps the queue.

20120809-104128.jpg

I cut the sleeves off and overlock them using a narrow hem, stretching the fabric like mad to get a frilly edge. It’s called a lettice hem – here are some good instructions, if you’re interested.

20120809-104106.jpg20120809-114202.jpg

Then I cut through one layer of the bottom hem of the tshirt and lettice-hem the resulting lower edge, again. From the leftover sleeve material, I cut two long cucumber shaped ovals, and lettice-hem the edges. Finally, I straight stitch the frills to the existing armscye-sleeve seam. They flop over quite pleasingly.

The End.
Now. Where was I?
20120809-104050.jpg

Jump to the beat

Sewing soundtrack: Stacy Lattisaw’s Jump to the beat! If I could have sewed wearing roller skates, I surely would have.

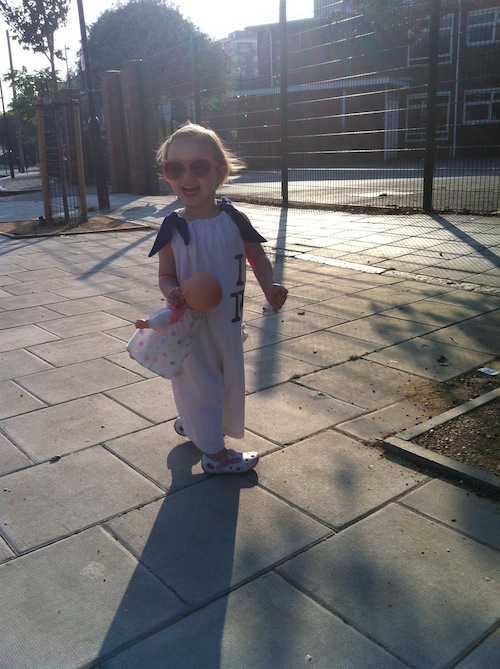
Hubby’s I ♥NY t-shirt has had a bit of a rough time over the years, sad to say – pale pink splodges and shrinkage, so off into the refashion pile it goes. Flush from the success of the Poppy Playsuit (she wears it!), I rustle up this number for Little Miss in a couple of hours.

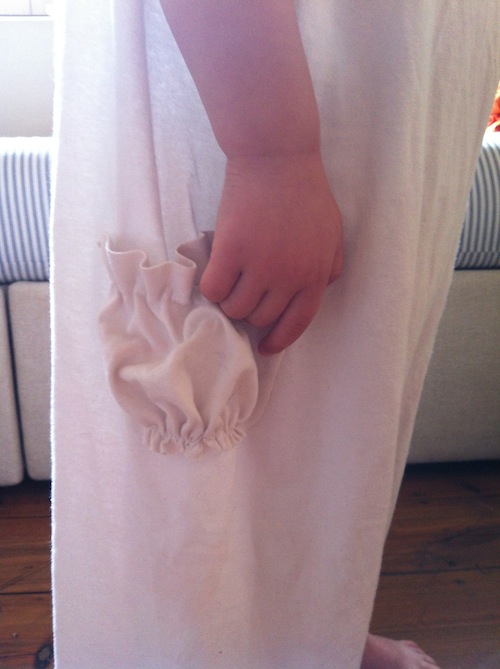
This needs just one adult size tshirt. Cut it out like this – I used guesswork, a pair of shorts and a tshirt to get the proportions about right. It’s supposed to fit loose, so precision not necessary. First sew on the pockets. The pockets are made from the sleeves, so have a pre-finished hem. Gather the tops of the pockets by running a length of shirring elastic through the hem, and gather the bottoms of the pockets with a long running stitch.

NY jumpsuit pocket closeupNext sew the leg seams and crotch/centre front seam. I serged it. Easy-peasy. Then finish the underarm edge by folding a 4mm hem (twice) and multi-stitch zig-zagging it – this is the bit that was the original t-shirt’s neckline.

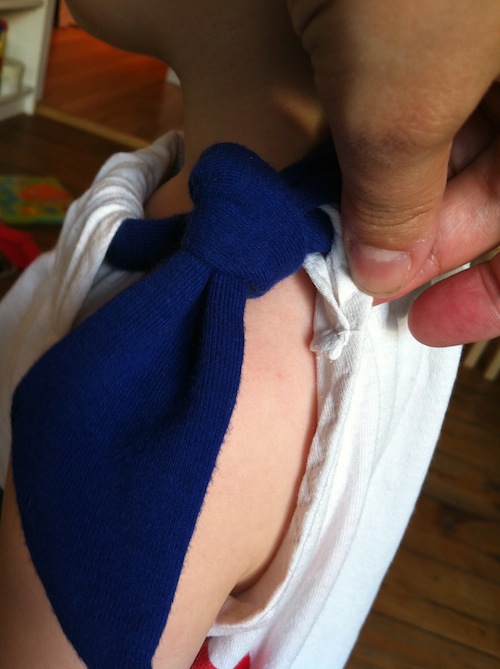
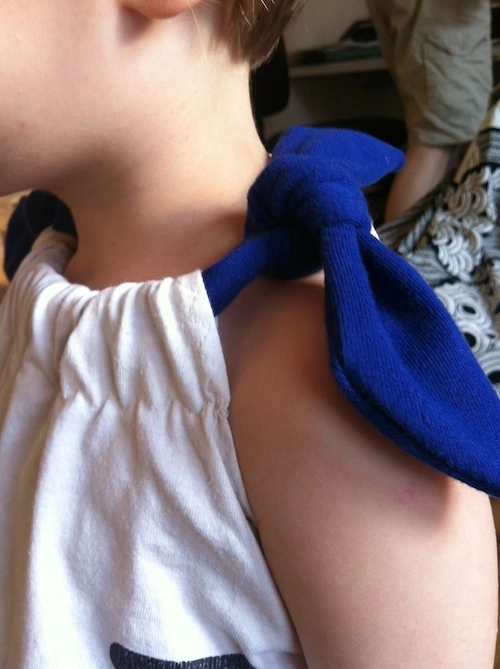
NY jumpsuit underarm detailLastly, fold over about 5cm at the top neck edge, and multi-stitch-zig-zag that too. This creates the channel to feed the ties through.

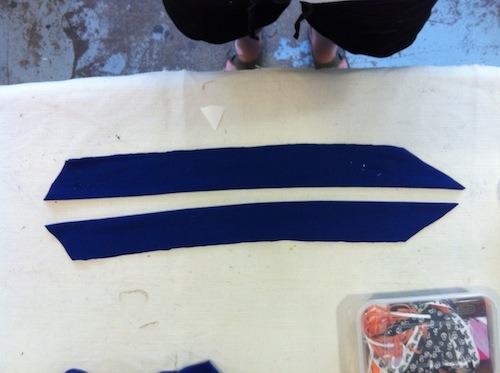
NY jumpsuit strap channelYou can use ribbon, jersey scraps or anything else that works for you – I used the sleeve of another old tshirt and made these tapered tubes.

NY jumpsuit straps

I left a gap in the stitching about halfway along the long edge so I could turn the tube inside out. After feeding the ties through, I secure them with a few straight stitches at the front/back centre seam.

DONE. And she wears it. I couldn’t get Little Miss to jump to the beat so we rocked down the street instead! Happy days!

NY jumpsuit in action

Poppy playsuit

20120720-155956.jpg
Loved this poppy print when I spotted it in a charity shop and decided to buy it whatever it turned out to be. And it was a cute shirred top… for a 12 year old.

There’s no way that’ll be me, so this is obviously destined for a certain Little Miss, whose wardrobe has a large poppy-playsuit sized hole in it. There’s enough fabric for my playsuit vision, although early signs are ominous – I hold it up to her to gauge size and she screams and throws herself to the floor. Oh dear.

20120720-155405.jpgUndaunted, I trim about 20cm off the overall width, and use the spare fabric for a couple of wide-ish shoulder straps – the original straps were a bit cheese-cutter for little shoulders. I cut a semi-circle out of the hem to create legs – not sure how well this will work, but we’ll see. The cute, gathered pouch pockets move over easily to sit at her hip height – I hope she finds something interesting (and non-staining) to put in them!

20120720-160119.jpgMore importantly, I wonder if she’ll wear it?

Drawing on stripes

20120719-100919.jpg
I LOVE stripes. My husband loves stripes. So we reckon Little Miss will too, damnit.

In that hope, I took a tshirt that greyed in the wash, and pepped it up by adding Breton stripes with a Dylon Fabric Painting Broad Nib Pen. As you can see, we’ve gone for the artisan look. Oh alright – I was rubbish at it. Drawing straight even lines on jersey is hard! Disappointed but not disheartened – the final tshirt has *some* impact…

Next time, I’ll

  • stretch the fabric really tightly over cardboard to minimise stretch/drag
  • mask off the stripes with tape for a more even line
  • draw *down* the fabric (not across) – this will take longer but gives a more even colour application because the fabric stretches less
  • practise writing her name better!

20120719-102345.jpg

Four tea-towel lunchbags – warts and all


Everything starts somewhere. These four lunchbags started life because we had so many teatowels (and much other crap, truth be told) that the kitchen drawer wouldn’t close. So the drawer got a good overhaul and into the bin went four pretty tea towels that only dry one plate before becoming limp, damp rags. Pointless.

So, hating seeing textiles in a bin, I lifted them out and tucked them away in the stash. They seemed perfect for lunch sacks, and I have just the tutorial: Lemon squeezy’s lunch sack. I’ve have been dying to use it – it’s a brilliant tutorial, super clear instructions, a very simple construction method – and it looks great!

two lunchbags

two lunchbags rear

I adjusted the measurements to give them a wider base – that way they fit perfectly the plastic takeaway boxes I use for my leftover lunches. I used John Lewis’s shower curtain fabric for the lining – which means leaks are very water-proofed. The colours of the towels look pretty groovy and the finished bags are clearly not from Asda – or the same as anyone else’s.

I’m really pleased to have completed them – they will be put to good use, as I’m taking lunch into work more often these days (King’s Cross is not great for quick and satisfying snacking) and Marina needs snack bags when we’re out and about.

lunchbag from tower of london tea towel

lunchbag with lid open

lunchbag interior with label

Why warts and all? I have to say, that they’re neither my proudest achievement nor most enjoyable sewing experience. Why? Because I found this simple project really hard. Working with stabiliser makes for really hard, manual sewing, because your fabric is really….stiff!

And even harder to apply bias binding to. I’ve not much experience working with bias binding, and this was my first experience of using my bias binding foot, which I found really fiddly to use. So I was disappointed that the ‘more finished look’ I was hoping for is actually the bit that looks the crappest: wrinkled, uneven stitching and very wonky in the inner corners by the lid.

lunch bag wonky stitching

And I stupidly used a different colour thread so all the non-smooth stitching, wrinkles and swerves missing the inner corners are very, very obvious.

BUT look. They are now off the to-do list, and hey, today, that’s the most important thing. I’m sure as I put them to use I’ll notice these things less, and be a bit more forgiving of myself and my less-than-perfect efforts. And, seriously, I’m not about writing blog posts that just present a perfect sheen of glossy gorgeousness. This was the result of some hard work!

About me


I started this blog to help me Get Things Done: sewing and knitting mostly.
But now I have a daughter! So I continue to daydream in enormous detail about what I'd like to make, but squeeze the 'doing' into precious naptimes and evenings.

Can I keep it up? Time will tell!

Want to follow my blog and get notifications of new posts by email?

Join 55 other subscribers

Older posts